"Spunky"
by Fred Nachbaur, Dogstar Music ©2001
2: HOW IT WORKS
THE POWER SUPPLY
It's been said that an amplifier is just a modulator for a power supply, so we'll have a look
at this important circuit component first. The diagram below shows that power supplies don't
have to be complicated, especially in low-power designs.
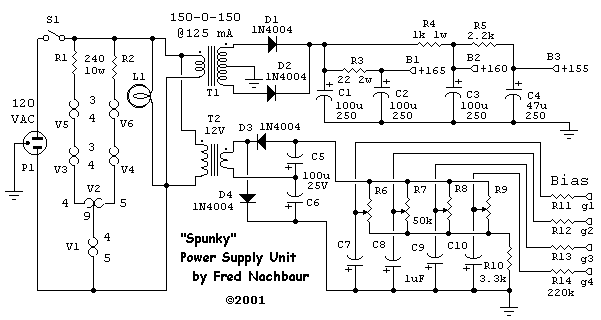
Schematic, Spunky's Power Supply
The filaments are powered directly from the 120 volt AC line, minimising the size of the
transformer(s) required to drive the amplifier. Note the slightly unusual series-parallel
arrangment; each pair of 35C5 output tube filaments is in series with one half of the 12AU7
dual triode. The center-tap of the 12AU7 sums the two branch currents (150 mA each) into the
preamp tube, giving 300 mA as required for this valve's heater supply.
While unusual, this geometry is eminently stable and safe. If any tube is removed (or its
filament burns out), none of the others will suffer as a result, unlike some series-wired
television sets where a single burnout could take out several other tubes at the same time.
Each branch of two 35C5's drops 70 volts. Add in the 6V drop across each half of the 12AU7,
and the 9V drop across the 9JW8 input tube, and we have 85 volts. The two dropping resistors
R1 and R2 each drop 36 volts (150 mA x 240 ohms = 36 V), for a nominal line input voltage of
121 volts. Because of this dependance on 120 volt line voltage, this design is unfortunately
not practical for 240 volt AC supplies.
Incidentally, the two dropping resistors get quite hot during normal operation. I suggest
cementing them to the chassis, and placing a small heat-sink on the other side to help
dissipate the generated heat. The heatsinks supplied with fans for 486 processors are perfect
for this. (... just in case you wondered what the CPU heatsink was doing in the pictures!)
The B+ supply is very conventional, consisting of a small plate transformer (150 volts either
side of center-tap), a full-wave rectifier, and typical CRC filtering networks. The idea here
is to get approximately 165-200 volts DC at the first filter output (B1) at quiescent current
(about 80 mA), with enough headroom for full-signal conditions (about 125 mA). At 165 volts,
maximum output power will be on the order of 7 watts; at 200 volts you can expect as high as
9 watts.
A small (12 volts at 100 to 300 mA) separate transformer is used to feed a voltage-doubler
circuit, which supplies the four variable bias outputs for the finals. The absence of regulation
on either the B+ or bias lines is actually not a problem, since it in fact gives a certain
degree of self-adjusting capability. If the power-line voltage sags, causing the B+ to decrease,
the bias will also decrease, tending to increase the bias current and keep the plate
dissipation relatively constant.
THE MAIN AMPLIFIER
Here is a schematic of the main amplifier portion of our circuit:
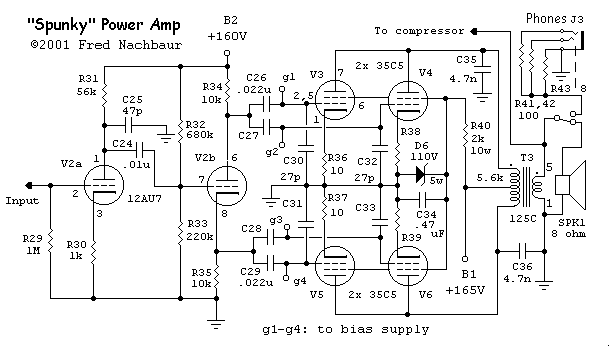
There's nothing really surprising here, either. Each pair of tubes has its plates and
screens tied together, but the control grids are brought out separately to allow independant
bias adjustment. The output transformer is a Hammond 125C "universal" 8 watt push-pull
device, that sounds surprisingly good considering its small size and relatively low cost.
Note that there are 4700 pF capacitors (C35, C36) at each plate junction to ground, i.e.
effectively in parallel with the output. This is to limit high-frequency response. In guitar
amplifiers, excessive high-frequency is a bane rather than a boon, since typical electric
guitar signals will rarely have much content higher than a few kilohertz anyway. Leaving the
bandwidth too wide only invites instability (due to cable runs, proximity to other gear, etc.)
and contributes to excessive hiss and other high-frequency artifacts. For this reason, you'll
find bypass capacitors at every stage in this design, as with other well-thought-out guitar
amplifier designs.
The 27 pF capacitors C30-C33 at the output valve grids are really not needed, but again I put
them there as added insurance against ringing or outright oscillation. They're cheap, and can
do no harm being there.
As in the "Li'l 4x4", the screens are supplied by a simple regulated supply consisting
of 110V zener diode D6 and resistor R40. This keeps a relatively constant voltage on the screen
grids, yet allows the voltage on them to sag in the event that screen current becomes excessive.
C34 is a screen bypass capacitor, and should be a reasonable quality mylar or similar capacitor.
Interestingly, unlike the 30A5/HL94, the 35C5 has a proclivity to oscillate if electrolytic
screen bypass caps are used.
The small 10-ohm cathode resistors are provided to make it easy to measure cathode current,
giving an excellent way of adjusting the control grid bias for each valve. The measured voltage
will be ten times the cathode current; for instance, if you read 0.250 volts, the cathode current
is the recommended 25 milliamperes (0.025 A). The grids are independantly adjustable for bias, as
mentioned above, requiring separate input coupling caps at each valve.
The 35C5 grids are fed from a cathodyne phase-splitter, also called a "concertina"
circuit, since the plate and cathode voltage push and pull in opposite directions, much like
the little accordions for which the circuit is named. Given that the cathode current and the
plate current in this 12AU7 triode section must be the same in class A operation, it follows
that the output voltages will be equal but opposite under equal-load conditions. It should be
noted that the concertina circuit does best if the plate and cathode load resistors are a good
deal lower than the input resistance of the following stage - a requirement that is eminently met
in this design (about an 11:1 ratio of effective grid resistance to plate/cathode load).
Finally, the input stage consisting of the other half of the 12AU7 is a pretty generic
class A resistance-coupled amplifier. Again, C25 is there to limit high frequency response.
The stage is cathode biased by R30, which is unbypassed to give some local current feedback
to linearise the stage's response.
At the opposite end, the speaker output is switched via an integral switch in the headphone
jack. Note that it is important in valve designs to provide a load at all times, which is
why it is necessary to use a double-throw switch and resistor R43 (8 ohms, 10W). R41 and R42
are dropping resistors to the headphones, preventing excessive power from being delivered to
the phones. Note that the use of two resistors and a stereo jack allows the use of either
stereo or monaural headphones.
The output voltage is also applied to the switchable compressor circuit, described in the
next section.
THE PREAMPLIFIER
This is the schematic diagram of "Spunky's" pre-amplifier circuitry, completing
the project:
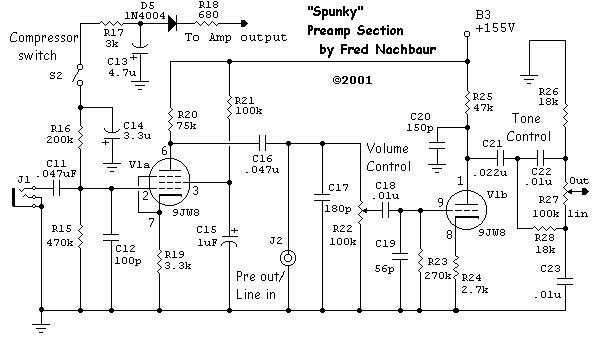
Again, the approach is direct and straightforward in the preamp circuit. Like the Li'l 4x4,
a pentode stage is used for input, partly because of its high gain and partly because I just
like the sound of small-signal pentodes. Another bonus is that pentodes (even the sharp-cutoff
variety) lend themselves quite well to gain control by varying the grid bias -- a property
we make use of in the compressor circuitry.
Pentode stages also exhibit a high output resistance, making it almost trivial to include
a line in/out jack right at the output of the stage. This is also a good place to put the
volume control, which in turn feeds a completely standard triode 2nd-amplifier stage. Again,
both stages are cathode biased, with the cathode resistor unbypassed to provide local
negative feedback. (It should be noted, however, that the amount of feedback in the pentode
stage varies when the compressor is enabled and active.)
Once again, small capacitors are connected at every node, limiting high-frequency response. The
result is an extraordinarily stable amplifier, albeit unsuitable for hi-fi applications where
the sharp rolloff around 10 kHz would be considered inappropriate.
The compressor is very similar to the
compressor option for the Li'L 4x4. The main difference
is that component values are fixed, and compressor control reduced to a simple toggle switch.
You might want to experiment with the values, though I doubt that your chosen values will be
too far off from the ones given here.


