
April 30, 2002
Part 2: Metering
When building a larger project, it is convenient to have metering on crucial voltages and
currents. This can save a lot of time (not to mention wear-and-tear on your nerves) while
debugging, and has the bonus of giving a nice professional touch to the end result.
Dogzilla sports a nice vintage meter, with a 500 µA full-scale deflection, and
calibration from 0 to 1. A fifteen-pole switch allows selection of individual cathode
currents in each of the six output tubes; raw, regulated and screen B+ supplies;
main negative supply; filament supply; compressor voltage level; and relative output
power from the main amp and from the "small-amp emulator".
The schematic below should be pretty straight-forward. The particular movement I used
has a DC resistance of about 270 ohms, so if you use a different meter you'll have to
take both its resistance and FS sensitivity into account when choosing your resistor
values at the various MP metering points. It should be noted, that for safety
sake higher voltages (over 300) are metered by going into a voltage divider, rather than
using the simple series resistor as for the lower voltages and currents.
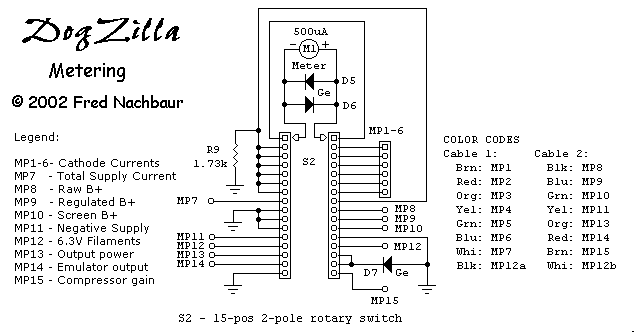
Schematic, Metering switching
Resistor R9 is a shared scaling resistor for the various current measurements.
Diode D7 is a shared rectifier for the two output power settings. D5 and
D6 protect the meter movement in the event of unforeseen catastrophe.
If running your metering signals through a single multi-conductor cable, it's a good
idea to document your colour-coding, in case you have to troubleshoot it later. The
colour-codes on the schematic were originally just my notes to myself, but I left them
since they do no harm there. ;-)


